How to Upload a Configuration on an Android Tablet
When building an Android app, it's important that you e'er examination your app on a real device earlier releasing it to users. This folio describes how to set up your development environment and Android device for testing and debugging over an Android Debug Bridge (ADB) connectedness.
Set up a device for development
Before you lot can commencement debugging on your device, decide if you desire to connect the device to using a USB cable or Wi-Fi. Then do the following:
-
On the device, open the Settings app, select Developer options, and and so enable USB debugging (if applicable).
-
Ready your system to detect your device.
- Chrome Os: No additional configuration required.
- macOS: No additional configuration required.
-
Ubuntu Linux: There are two things that need to be set correctly: each user that wants to utilise adb needs to be in the plugdev grouping, and the system needs to have udev rules installed that cover the device.
plugdev grouping: If you see an fault bulletin that says y'all're not in the plugdev group, you'll need to add yourself to the plugdev group:
sudo usermod -aG plugdev $LOGNAMENote that groups simply get updated on login, so you'll need to log out for this change to take effect. When you log back in, you tin can employ
idto check that y'all're now in the plugdev group.udev rules: The
android-sdk-platform-tools-commonparcel contains a community-maintained default set of udev rules for Android devices. To install:apt-get install android-sdk-platform-tools-common -
Windows: Install a USB driver for ADB (if applicable). For an installation guide and links to OEM drivers, see the Install OEM USB drivers document.
Connect to your device using USB
When yous are set up and plugged in over USB, you can click Run  in Android Studio to build and run your app on the device.
You lot tin can also use adb to effect commands, every bit follows:
- Verify that your device is connected by running the
adb devicescontrol from yourandroid_sdk/platform-tools/directory. If connected, you'll come across the device listed. - Issue any adb command with the
-dflag to target your device.
Connect to your device using Wi-Fi
Android eleven (and later on) supports deploying and debugging your app wirelessly from your workstation via Android Debug Bridge (adb). For example, you can deploy your debuggable app to multiple remote devices without physically connecting your device via USB and contending with common USB connection issues, such as driver installation.
To utilize wireless debugging, y'all need to pair your device to your workstation using a pairing code. To begin, consummate the following steps:
- Ensure that your workstation and device are connected to the aforementioned wireless network.
- Ensure that your device is running Android xi or higher. For more informaton, run across Check & update your Android version.
- Ensure that you have Android Studio Bumblebee Canary. You tin download it here.
- On your workstation, update to the latest version of the SDK Platform-Tools.
To connect to your device, follow these steps:
- Open Android Studio and select Pair Devices Using Wi-Fi from the run configurations dropdown carte du jour. The Pair devices over Wi-Fi window pops up, as shown below.

Figure 1. Run configurations dropdown card.
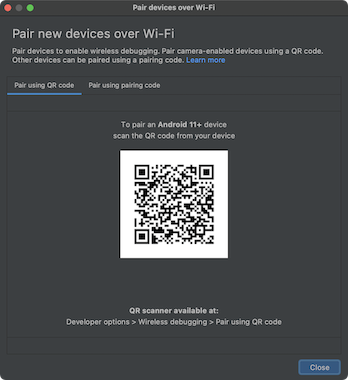
Figure two. Popup window to pair devices using QR code or pairing lawmaking.
- Enable developer options on your device.
- Enable debugging over Wi-Fi on your device.
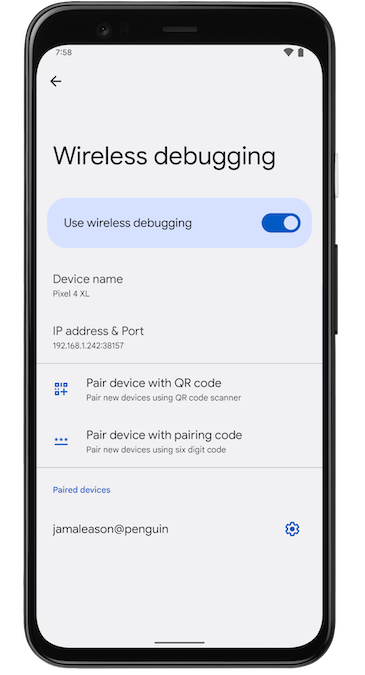
Figure 3. Screenshot of the Wireless debugging setting on a Google Pixel phone.
- Tap on Wireless debugging and pair your device:
- To pair your device with a QR code, select Pair device with QR code and browse the QR code obtained from in a higher place.
- To pair your device with a pairing code, select Pair device with pairing lawmaking from the Pair devices over Wi-Fi window to a higher place. On your device, select Pair using pairing code and accept note of the six digit pin lawmaking. One time your device appears on the Pair devices over Wi-Fi window, you can select Pair and enter the vi digit pin code shown on your device.
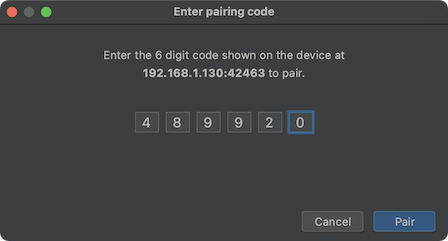
Figure 4. Instance of 6 digit pin code entry.
-
Afterwards you are paired, y'all can attempt to deploy your app to your device.
To pair a different device or to forget this device on your workstation, navigate to Wireless debugging on your device, tap on your workstation name under Paired devices, and select Forget.
Troubleshoot device connection
If your device is not connecting to Android Studio, try the following to resolve the issue.
Troubleshoot with the Connection Assistant
The Connection Assistant provides step-past-step instructions to help y'all set up up and use a device over the ADB connection.
To commencement the assistant, cull Tools > Troubleshoot Device Connections.
The Connectedness Banana provides instructions, in-context controls, and a list of connected devices in a series of pages in the Banana panel. Use the Side by side and Previous buttons at the lesser of the Assistant panel to piece of work through the pages equally needed:
- Connect your device over USB: The Connection Banana begins by prompting you to connect your device over USB, and it provides a Rescan USB devices button with which yous tin outset a new browse for connected devices.
- Enable USB debugging: The Connection Banana then tells y'all how to enable USB debugging in the on-device developer options.
- Restart the ADB server: Finally, if y'all yet don't see your device on the listing of bachelor devices, you can use the Restart ADB server push on the last folio of the Connexion Banana. Restarting the ADB server also causes ADB to scan for devices again. If you still don't see your device on the list of available devices, try the troubleshooting steps in the next section of this page.
Resolve USB connection issues
If the Connexion Assistant is not detecting your device over USB, you tin try the following troubleshooting steps to resolve the issue:
Check that Android Studio tin connect to the Android Emulator
To check if the issue is being acquired by a connection problem betwixt Android Studio and the Android Emulator, follow these steps:
- Open up the AVD Manager.
- Create a new AVD if you don't already have one.
- Run the emulator using your AVD.
- Do one of the following:
- If Android Studio can't connect to the emulator, download the latest SDK Platform Tools then attempt again.
- If the emulator starts successfully, cheque the USB cable.
Check the USB cablevision
To cheque if the upshot is beingness caused past a faulty USB cablevision, follow the steps in this department.
If you accept another USB cablevision:
- Connect the device using the secondary cable.
- Check if the Connection Assistant can at present detect the device.
- If the device is not detected, endeavor the primary cable again.
- If the device withal isn't detected, presume that the problem is with the device and check if the device is set for development.
If you don't have another USB cable just you do have some other Android device:
- Connect the secondary device to your computer.
-
If the Connectedness Banana tin can notice the secondary device, assume that the trouble is with the primary device and cheque if the device is prepare upward for development.
If the secondary device is not detected, the problem might be with the USB cable.
Cheque if the device is gear up for development
To check if the issue is being caused by settings on the device, follow these steps:
- Follow the steps in the Prepare upwards a device for development section.
- If this does not resolve the problem, contact the device OEM's customer support for assist. Tell the client back up representative that the device won't connect to Android Studio using ADB.
Resolve wireless connection issues
If you are having issues connecting to your device wirelessly, you can try the following troubleshooting steps to resolve the event.
Bank check if your workstation and device meet the prerequisites
To encounter the prerequisites for wireless debugging, ensure that:
- Your workstation and device are connected to the same wireless network.
- Your device is running Android xi or higher. For more information, encounter Check & update your Android version.
- You lot accept Android Studio Bumblebee. You tin can download information technology here.
- You lot have the latest version of the SDK Platform Tools on your workstation.
Check for other known issues
The post-obit is a list of current known issues with wireless debugging in Android Studio and how to resolve them.
- Wi-Fi is non connecting: Some Wi-Fi networks, such as corporate Wi-Fi networks, may block p2p connections and not allow you to connect over Wi-Fi. Try connecting with a cable or another Wi-Fi network.
- ADB over Wi-Fi sometimes turns off automatically: This tin can happen if the device either switches Wi-Fi networks or disconnects from the network.
RSA security key
When y'all connect a device running Android four.2.two (API level 17) or higher to your computer, the system shows a dialog request whether to take an RSA cardinal that allows debugging through this computer. This security machinery protects user devices because it ensures that USB debugging and other adb commands cannot exist executed unless you're able to unlock the device and acknowledge the dialog.
Source: https://developer.android.com/studio/run/device
0 Response to "How to Upload a Configuration on an Android Tablet"
Post a Comment